Guide to A Twitter Developer Account API & Secrets
Table Of Content
- Introduction
- Twitter developer account login
- Twitter Developer account free
- Twitter developer account price
- Twitter developer account sign up
- How to create an app in Twitter developer account
- Twitter developer account settings
- APIs Key and secrets
- Conclusion
Introduction
This article is for learners who want to know about the ultimate guide to A twitter developer account, APIs, X formally Twitter API, all you need to know about the Twitter API and key secrets.
Why set up a Twitter Developer Account
This allows you to access Twitter’s API, which allows different functions such as:
Twitter developer account login
You can log in to your Twitter Developer Account by following these three(3) steps:
1. Visit the Twitter Developer Portal
Go to Twitter Developer Portal
2. Click on “Sign In”
Input your Twitter account credentials to log in.
If you haven’t registered, you may need to apply for access.
3. Access Your Developer Dashboard
Once logged in, you can manage API keys, create projects, and configure apps.
Twitter developer account price
Twitter offers different pricing tiers for its Developer API access. Here’s a breakdown of the pricing plans:
Cost: $100/month
Limits: 50,000 tweets per month (read), 3,000 tweets per month (write), Full access to v2 endpoints and Basic support
Cost: $5,000/month
Limits: 1M tweets per month (read), 300,000 tweets per month (write), Elevated access to historical data and More advanced API features.
Cost: Custom pricing (varies based on needs)
Limits: Unlimited or high-volume API access, Dedicated support and Custom data and analytics solutions.
For the latest pricing details, kindly visit the Twitter API Pricing Page.
Twitter developer account sign up
To create a Twitter Developer Account, Follow these steps:
1. Go to the Twitter Developer Portal
Visit Twitter Developer Portal
2. Click “Sign Up”
Sign in with your existing Twitter (X) account or create a new one.
3. Apply for Developer Access
Click “Apply for a Developer Account” and choose your use case (e.g., personal, business, academic).
4. Fill Out the Application Form
Provide details on how you’ll use the API, including: The purpose of your project, Expected API usage and Compliance with Twitter’s policies
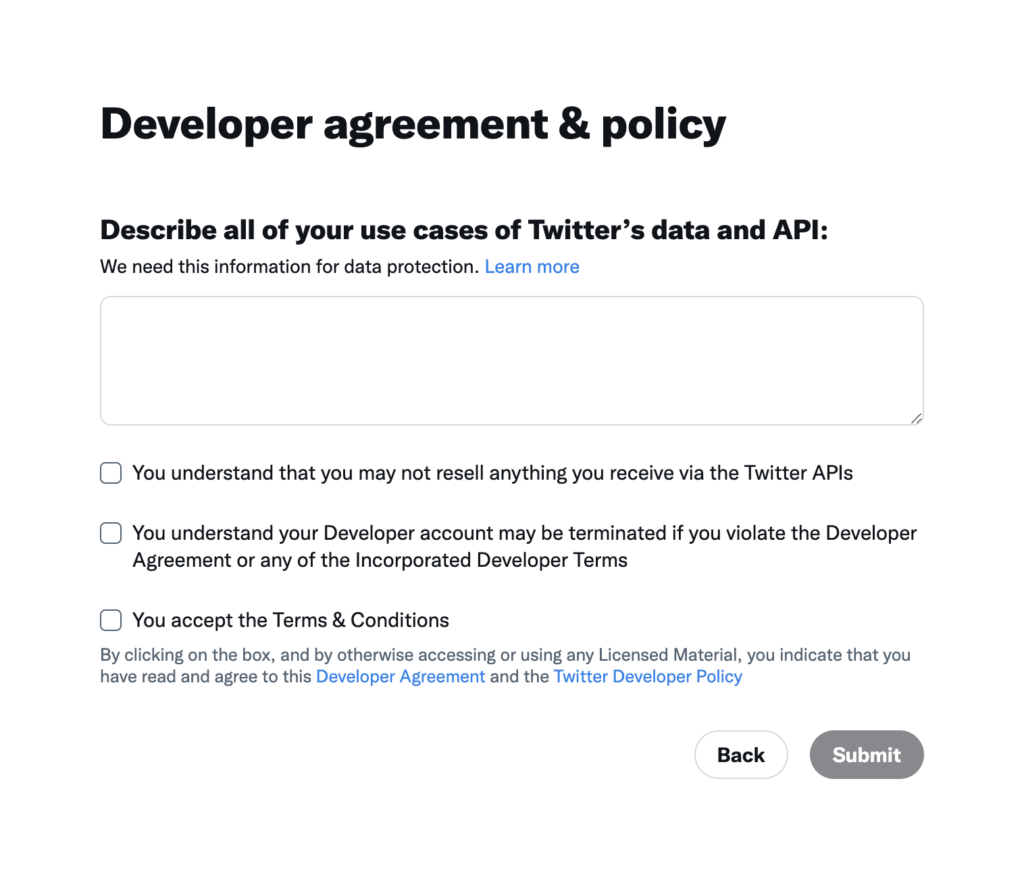
5. Agree to Terms and Submit
Review Twitter’s Developer Agreement and submit your application.
6. Wait for Approval.
Twitter may review your application before granting API access (especially for higher-tier plans).
Once approved, you can start creating API keys and accessing Twitter data.
How to create an app in Twitter developer account
Once your Twitter Developer Account is approved, follow these steps to create an app:
1. Log In to the Twitter Developer Portal
Go to Twitter Developer Portal
2. Navigate to the Developer Dashboard
Click on “Developer Portal” in the top-right corner.
Select the Project under which you want to create the app.
3. Create a New App
Click “Add App” (or “Create an App” if it’s your first one).
Provide the required details: App name (must be unique), App description, Website URL (optional but recommended), Callback URL (if using OAuth) and Permissions (read, write, direct messages)
4. Generate API Keys and Tokens
After app creation, go to “Keys and Tokens”
Copy and save: API Key, API Secret Key and Bearer Token (for authentication)
5. Configure App Permissions (Optional)
Under App Settings, choose permissions: Read-Only (for data retrieval), Read and Write (for posting tweets) and Read, Write and Direct Messages (for full access)
6. Test Your App
Use Postman or a script in Python (Tweepy) or Node.js (Twitter API SDK) to test API requests.
Your app is now set up!
Twitter developer account settings
You can configure your Twitter Developer Account settings by following these steps:
1. Log in to the Twitter Developer Portal
Go to Twitter Developer Portal
2. Go to Account Settings
At the top-right corner, click on your profile icon.
From the dropdown menu, Choose Account Settings.
3. Key Settings You Can Manage:
Account Information- Update email, contact details, and organization name (if applicable). Manage developer agreement and compliance policies.
API Keys and Authentication- View and regenerate API keys (API Key, Secret Key, Bearer Token). Manage OAuth settings and permissions (Read-only, Read and Write, Direct Messages).
Project and App Management- Modify app details (name, description, website URL). Configure callback URLs and authentication settings for OAuth.
Rate Limits and API Usage- Check API usage limits and request upgrades if needed. Upgrade to a higher-tier plan for more access.
Security and Access Control- Enable 2FA (Two-Factor Authentication) for account protection.Manage team access for shared development projects.
4. Save Changes and Test Your Configuration
Ensure updates are saved, then test API calls to verify everything works.
APIs and Key Secrets
Good news is, it’s an extension of your normal Twitter account and you can apply for a Developer Account within a couple of minutes here. Once the page opens:

After clicking Submit, it automatically creates a Developer Account for you and takes you to the Developer Portal.

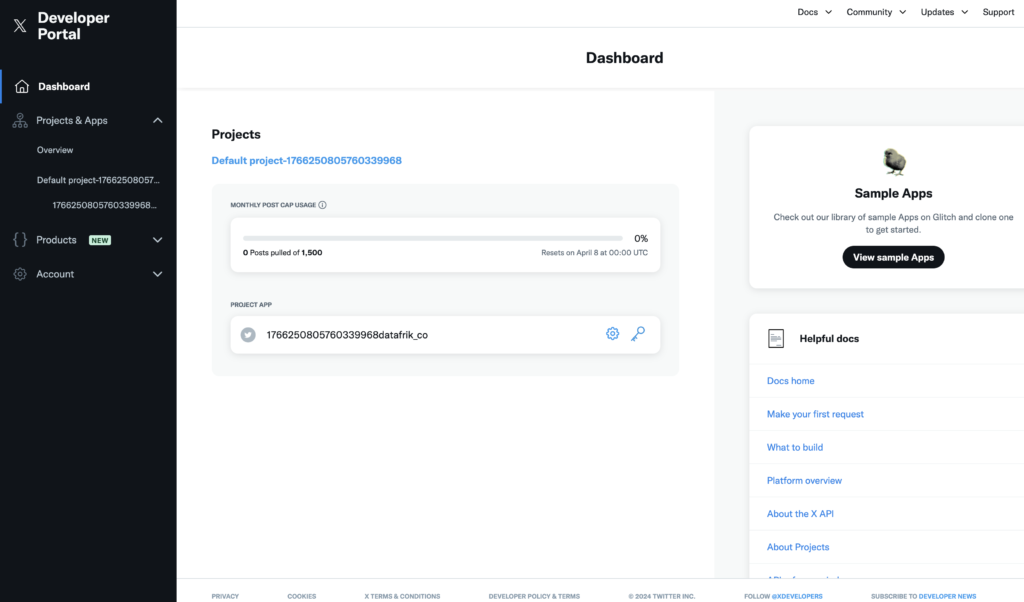
Since you can only afford the FREE access, you shouldn’t bother yourself with all the technical jargons that surround Projects, and Apps. All you need to know is that you’re entitled to only 1 Project and 1 App. So, let’s create a Project and an App. To do this, you can just edit the default Project name and the App name.
We’d change the Project name from ‘Default project-1766250805760339968’ to ‘Twitter Project’ by clicking on the Project then clicking on Settings. We can also change the App name to a unique name such as ‘Creating A Tweet App’. Now that we have the Project and App names out of the way we need to get our Keys and Secrets. These will allow us connect our account to the API using Tweepy.
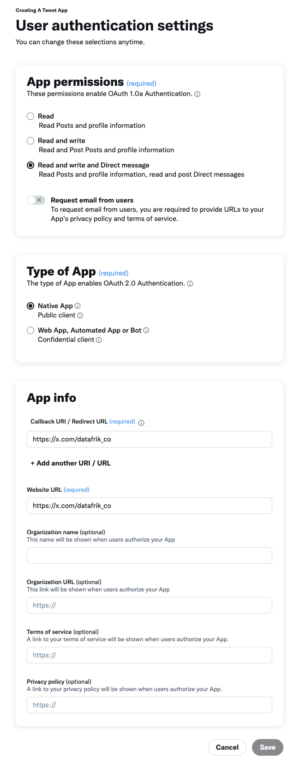
Before getting to the keys and secrets part, we need one final detail. Click on the Settings icon and click to edit the User authentication settings. Change the app permission from read to read and write and direct message, leave type of app as native app. Finally in the app info section, input the link to your profile as the callback url and website url. Then save.

Keys & Secrets
There are a couple of weird looking strings you need in order to be able to authenticate your app and have access to the Twitter API using your account. I won’t bore you with the technicalities but just for the sake of it, these are the different ‘weird looking strings’ you’d need:
- API Key and Secret: Essentially the username and password for your App. You will use these to authenticate requests that require OAuth 1.0a User Context, or to generate other tokens such as user Access Tokens or App Access Token.
- Access Token and Secret: In general, Access Tokens represent the user that you are making the request on behalf of. The ones that you can generate via the developer portal represent the user that owns the App.`
These Keys, Tokens, and Secrets are very necessary as you’d see in the other articles when we use them alongside the Tweepy library. You need to get them and store them securely. Exposing them can enable others have access to your Twitter account.
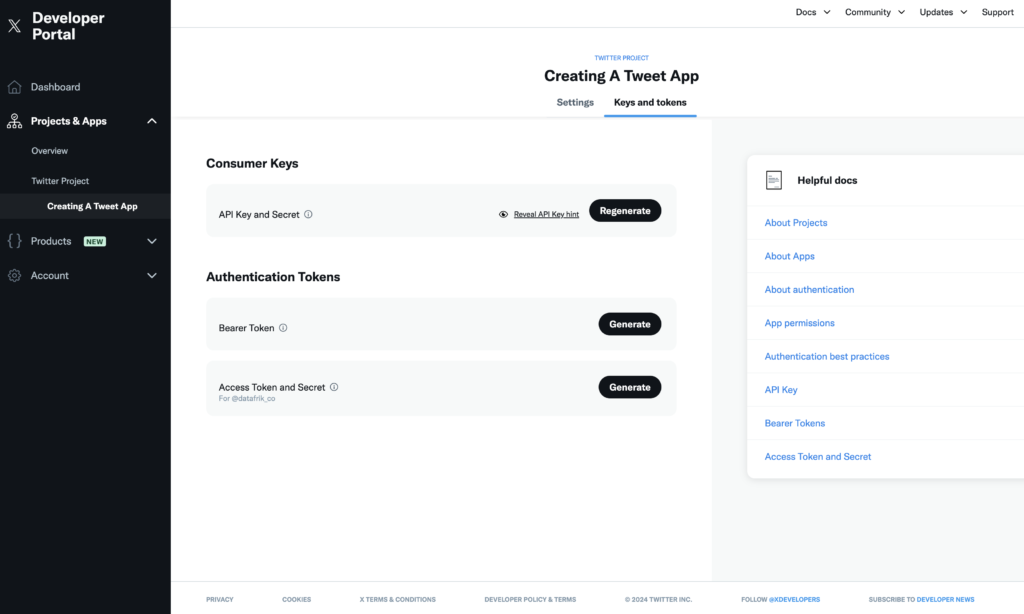
We firstly need to get the API key and Secret. We do this, by clicking on the app we created earlier on the left called ‘Creating A Tweet App’ and then selecting Keys and Tokens. This will show a page that contains the different secret weird strings we need. We need the Consumer Keys and Authentication Tokens, so click on the regenerate and generate keys to get them and save them securely. We’ll be using them in another article with the Tweepy API to write a tweet programmatically.

You need to know a bit of Python programming to follow along with the next part. check out our Python course here.
Now that you have your Developer Account, Keys and Secrets, check out the next article on Creating Your First Tweet Programmatically.


[…] That’s all you need to know about the Twitter API and their access levels. If you’d like to learn how to query the Twitter API and create your first tweet programmatically, stick around for the next article. To create a Twitter Developer Account, you can check out this article. […]